Sunday, August 15, 2010
Eating Curfew
Tuesday, August 10, 2010
Benefits of Circuit Training
The Benefits of Circuit Training
Exercise Like the Pros Do
-- By Lonnie Soloff, Cleveland Indians' Head Trainer
When developing a circuit training routine, a wide variety of exercises and equipment can be utilized. Much of the equipment is relatively inexpensive and includes surgical tubing, jump rope, your own body weight, dumbbells, medicine balls, physioballs and weight training machines. A circuit can consist of as few as six stations to as many as 15 stations based on the goals and pre-training levels of the participants.
Circuit training stations are generally sequenced in a way to alternate between muscle groups, which allows for adequate recovery. The rest interval between stations should be between 30-90 seconds and 1-3 minutes between circuits. A typical gym has several strength training machines and workstations, which enables the creation of several circuits. This benefit of variability challenges the skills of the participant and keeps them interested from session to session.
Circuit training plays an integral role in the offseason workouts of many professional athletes. It serves as a way to maintain general fitness while avoiding the high physical demands of in-season sport. Circuit training also serves as a segue to higher level strengthening programs in these athletes.
Monday, August 9, 2010
Week 15 Challenge: Circuit Training
Circuit training
From Wikipedia, the free encyclopedia
Circuit training is a combination of high-intensity aerobics and resistance training designed to be easy to follow and target fat loss, muscle building and heart fitness. An exercise "circuit" is one completion of all prescribed exercises in the program. When one circuit is complete, one begins the first exercise again for another circuit. Traditionally, the time between exercises in circuit training is short, often with rapid movement to the next exercise
 Week 15 Challenge: Circuit Training
Wednesday, August 4, 2010
Do's and Don'ts of Goal Setting
Do's and Don'ts of Goal Setting
Key Pieces to the Puzzle
as featured on sparkpeople.com
-- By Mike Kramer, Staff Writer
Goal achievement, especially when it comes to health and fitness, can be a mystery. Most of us have no trouble with Step 1 (Setting the Goal). Setting a goal is the easy part, it's those other steps that can be a puzzle. But you CAN turn achieving your goals into a science with the right strategies. Here are a few of our favorites:
DO create a plan. DON’T wait for "someday" to roll around.
Setting the goal is just the first step. Know where you’re going, what resources you’ll need, who can help and – most importantly – what Plan B is when life throws a monkey wrench into Plan A.
DO start small. DON’T focus on too many things at once.
Try focusing on one goal at a time. Use a small goal that you know you can do each day for the next two weeks, like getting up without the snooze or drinking eight cups of water. Build that first habit to boost your confidence and pick up speed.
DO write it down. DON’T forget to give yourself a deadline.
Deadlines turn wishes into goals. The act of writing down your goal is powerful enough to keep you committed and focused. Better yet, find a visual that represents your goal or how your life will be different. Seeing it makes it seem more possible.
DO be specific. DON’T deal in absolutes.
Avoid the words ‘some’ and ‘more’, as in "I will get SOME exercise" or "I will eat MORE veggies." It leaves too much wiggle-out room. Deal in measurable things that you have control over. And never say ‘never’ or ‘always.’ All or nothing is a common attitude that leads people back to bad habits.
DO leave room for failure. DON’T expect perfection.
Persistence is key. Accept the fact that you might not make it on the first try. In a recent study, only 40% of people who successfully followed New Year's resolutions did it on the first try; 17% of resolution achievers took six or more tries before they got it right – but they did get it right.
DO track your progress. DON’T fool yourself into failure.
Memory can be pretty selective. It conveniently forgets that extra brownie while remembering activity that never happened. The only way to know for sure is to track goals regularly with a checklist or journal.
DO reward your success. DON’T beat yourself up over failure.
This is the step that trips up most people. Negative thoughts are usually in our heads, telling us every day what we’re doing wrong. This is not the approach to take to succeed with your goals. Why not focus on what you’re doing right instead? If you take a step back, learn from it and take two steps forward.
DO find a support system. DON’T try to do it alone.
A goal buddy can make all the difference this time. People that can help are all around you – on the SparkPeople support message boards, at work, even in your own family. Just add one person to your support group, and you double your motivation, double your energy, double your commitment – and double your FUN.
DO make a commitment. DON’T ever forget that you can do it.
Thursday, July 29, 2010
Week 14: Sweet Free
Friday, July 23, 2010
Week 13 Challenge: Sprint Training
Week 13 Challenge: (July 26-Aug 2)
Complete the following workout 3 times this week. {You may want to space these workouts out as soreness may occur :)}...I love this workout!
High Intensity Interval Training: Sprint Interval Workout
This sprint interval workout is a type high intensity interval training (HIIT) that helps build endurance, increase your anaerobic threshold and burn more calories and fat both during and after your workout. For this workout, you'll have a longer warm up (10 minutes) before going into 4 all-out sprints at a Level 9 on this perceived exertion chart for 30 seconds each. Between each sprint, you'll recover at an easy pace for 4.5 minutes, giving you plenty of time to get ready for the next sprint.
Keep in mind that all-out effort is very challenging, so modify the sprint intervals as needed to fit your fitness level and goals. You can do this workout on any cardio machine (set to manual mode) or with any outdoor activity such as walking, running or cycling. This workout is best for intermediate or advanced exercisers.
| Time | Intensity/Speed | Perceived Exertion |
| 5 min. | Warm up at an easy-moderate pace | 4-5 |
| 5 min. | Baseline: Increase speed gradually to a comfortable, moderate pace | 5 |
| 30 seconds | Sprint all out as fast as you can | 9 |
| 4.5 min | Reduce speed to a comfortable pace to fully recover | 4-5 |
| 30 seconds | Sprint all out as fast as you can | 9 |
| 4.5 min | Reduce speed to a comfortable pace to fully recover | 4-5 |
| 30 seconds | Sprint all out as fast as you can | 9 |
| 4.5 min | Reduce speed to a comfortable pace to fully recover | 4-5 |
| 30 seconds | Sprint all out as fast as you can | 9 |
| 4.5 min | Cool down at an easy pace | 3-4 |
| Total : | 30 Minutes | |
"Remember that balance, posture and core muscles are the foundation for a good sprinter. Your goal should be to run at a faster speed, while exerting less energy.
Short and fast bursts of running have been proven to be more effective than hour-long jogs. You can't help but all those people that try to get in shape, and start doing long jogs, and six months later, there are no changes in their performance or appearance. Sprint training also saves time that would have been wasted doing traditional exercises." --Wikihow
Saturday, July 17, 2010
Week 12 Challenge: No Soda Week
Soft drink
Soft drink
From Wikipedia, the free encyclopedia
A soft drink (also referred to as soda, pop, soda pop or fizzy drink) is a drink that typically contains no alcohol, though may contain small amounts[1] (typically less than 0.5% by volume) and is usually referred to as a sugary drink. Soft drinks are often carbonated and commonly consumed while chilled or at room temperature. Some of the most common soft drinks include cola, flavored water, sparkling water, iced tea, sweet tea, sparkling lemonade (or other lemon-lime soft drinks), squash, fruit punch, root beer, orange soda, grape soda, cream soda, and ginger ale.
The term "soft" is employed in opposition to "hard", i.e. drinks with high alcoholic content by volume. Generally it is also implied that the drink does not contain milk or other dairy products. Hot chocolate, hot tea, coffee, tap water, juice, schorle or spritzer and milkshakes also do not fall into this classification.
Many carbonated soft drinks are optionally available in versions sweetened with sugars or with non-caloric sweeteners, such as diet soda.
Thursday, July 8, 2010
Week 11 Challenge: Plyometrics
Week 11 Challenge:(July 12-July18th) Complete a Plyometric Workout TWICE during week 11.
{If you have your own plyometric workout you may do that instead}
Lower Body Plyometric Exercises (Low Intensity)
 Squat Jumps
1. Stand with feet shoulder-width apart, trunk flexed forward slightly with back straight in a neutral position.
2. Arms should be in the ready" position with elbows flexed at approximately 90.
3. Lower body where thighs are parallel to ground and immediately explode upwards vertically and drive arms up. Do not hold a squat position before jumping up keep the time between dipping down and jumping up to a minimum.
4. Land on both feet. Rest for 1-2 seconds and repeat
Prior to takeoff extend the ankles to their maximum range (full plantar flexion) to ensure proper mechanics.
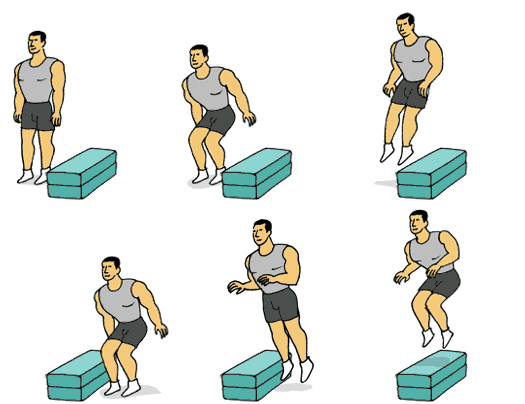
 Jump to Box
1.Stand facing box with feet slightly wider than hip-width apart.
2.Lower body into a semi-squat position and immediately jump up onto box. Do not hold a squat position before jumping up keep the time between dipping down and jumping up to a minimum.
3. Feet should land softly on box. Step back down (not jump back down) and repeat.
 Lateral Jump to Box
1. Stand side on to box with feet slightly wider than hip-width apart.
2. Lower body into a semi-squat position and jump up onto box. Do not hold a squat position before jumping up keep the time between dipping down and jumping up to a minimum.
3. Feet should land softly on box. Step back down (not jump back down) and repeat.
Lower Body Plyometric Exercises (Moderate Intensity)
 Split Squat Jumps
1. Stand with feet hip width apart. Take left leg and step back approximately 2 feet standing on the ball of back foot.
2. Feet should be positioned at a staggered stance with head and back erect and straight in a neutral position.
3. Lower body by bending at right hip and knee until thigh is parallel to floor then immediately explode vertically.
4. Switch feet in the air so that the back foot lands forward and vice versa.
Prior to takeoff extend the ankles to their maximum range (full plantar flexion) ensure proper mechanics.
 Tuck Jumps
1. Stand with feet shoulder-width apart, knees slightly bent, with arms at sides.
2. Jump up bringing knees up to chest.
3. Land on balls of feet and repeat immediately.
4. Remember to reduce ground contact time by landing soft on feet and springing into air.
 Lateral Box Push Offs
1. Stand to side of box and place the left foot on top of box.
2. Push off the box using the left leg only and explode vertically as high as possible. Drive the arms forward and up for maximum height.
3. Land with right foot on the box and left foot on the ground to the other side of the box.
4. Repeat from this side.
 Bounding
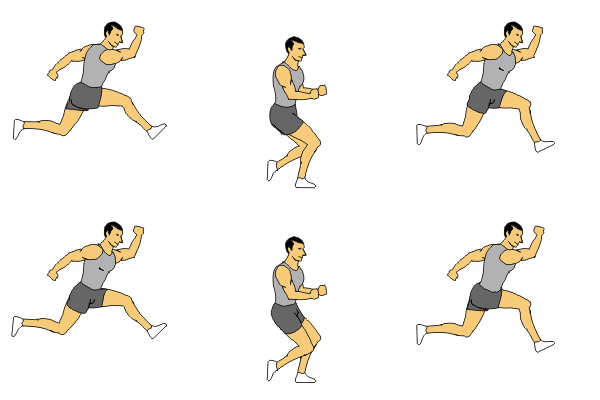
1. Jog into the start of the drill for forward momentum.
2. After a few feet, forcefully push off with the left foot and bring the leg forward. At same time drive your right arm forward.
3. Repeat with other leg and arm
4. This exercise is an exaggerated running motion focusing on foot push-off and air time.
 Bounding with Rings
1. Jog into the start of the drill for forward momentum.
2. After a few feet, forcefully push off with the left foot and bring the right leg forward. At same time swing left arm forward and land into the first ring, which is 3-4 feet out and to the left, with the right foot.
3. Continue and repeat with other leg and arm into the second ring, which is now 3-4 feet up and to the right.
4. This exercise is an exaggerated running motion focusing on foot push-off and air time.
 Box Drill with Rings
1. Stand with feet slightly wider than hip-width apart with your body facing the first ring.
2. Hop forward using both feet and land in first ring.
3. Now hop to the left and land in the ring to the side. Now jump backwards to land in ring behind you. Finish by jumping to your right to land in final ring.
4. Rest and repeat. Remember to keep ground contact time between bounds to a minimum.Hurdle Jumps
 Lateral Hurdle Jumps
1. Stand beside object to be cleared.
2. Bring knees up and jump vertically but also laterally off ground and over the barrier.
3. Land on both feet and immediately jump the other direction over barrier.
4. Try not to pause between jumps or sink down into a squat position.
Lower Body Plyometric Exercises (High Intensity)
 Jump to Box
1.Stand facing box with feet slightly wider than hip-width apart.
2.Lower body into a semi-squat position and immediately jump up onto box. Do not hold a squat position before jumping up keep the time between dipping down and jumping up to a minimum.
3. Feet should land softly on box. Step back down (not jump back down) and repeat.
 Lateral Jump to Box
1. Stand side on to box with feet slightly wider than hip-width apart.
2. Lower body into a semi-squat position and jump up onto box. Do not hold a squat position before jumping up keep the time between dipping down and jumping up to a minimum.
3. Feet should land softly on box. Step back down (not jump back down) and repeat.
 Split Squat Jumps
1. Stand with feet hip width apart. Take left leg and step back approximately 2 feet standing on the ball of back foot.
2. Feet should be positioned at a staggered stance with head and back erect and straight in a neutral position.
3. Lower body by bending at right hip and knee until thigh is parallel to floor then immediately explode vertically.
4. Switch feet in the air so that the back foot lands forward and vice versa.
Prior to takeoff extend the ankles to their maximum range (full plantar flexion) ensure proper mechanics.
 Tuck Jumps
1. Stand with feet shoulder-width apart, knees slightly bent, with arms at sides.
2. Jump up bringing knees up to chest.
3. Land on balls of feet and repeat immediately.
4. Remember to reduce ground contact time by landing soft on feet and springing into air.
 Lateral Box Push Offs
1. Stand to side of box and place the left foot on top of box.
2. Push off the box using the left leg only and explode vertically as high as possible. Drive the arms forward and up for maximum height.
3. Land with right foot on the box and left foot on the ground to the other side of the box.
4. Repeat from this side.
 Bounding
1. Jog into the start of the drill for forward momentum.
2. After a few feet, forcefully push off with the left foot and bring the leg forward. At same time drive your right arm forward.
3. Repeat with other leg and arm
4. This exercise is an exaggerated running motion focusing on foot push-off and air time.
 Bounding with Rings
1. Jog into the start of the drill for forward momentum.
2. After a few feet, forcefully push off with the left foot and bring the right leg forward. At same time swing left arm forward and land into the first ring, which is 3-4 feet out and to the left, with the right foot.
3. Continue and repeat with other leg and arm into the second ring, which is now 3-4 feet up and to the right.
4. This exercise is an exaggerated running motion focusing on foot push-off and air time.
 Box Drill with Rings
1. Stand with feet slightly wider than hip-width apart with your body facing the first ring.
2. Hop forward using both feet and land in first ring.
3. Now hop to the left and land in the ring to the side. Now jump backwards to land in ring behind you. Finish by jumping to your right to land in final ring.
4. Rest and repeat. Remember to keep ground contact time between bounds to a minimum.Hurdle Jumps
 Lateral Hurdle Jumps
1. Stand beside object to be cleared.
2. Bring knees up and jump vertically but also laterally off ground and over the barrier.
3. Land on both feet and immediately jump the other direction over barrier.
4. Try not to pause between jumps or sink down into a squat position.
 Zigzag Hops
1. Stand to the left of an agility ladder or similar object approximately 1-2 feet away.
2. Forcefully push off both feet and land the on the other side of the ladder.
3. Repeat and land feet back on the other side, continue repeating and so on down the ladder.4. Do not "double hop" upon each landing and keep ground contact time to a minimum.
Single Leg Tuck Jump
This is the same as the tuck jump exercise above only one leg is used. Upon landing another jump is performed immediately with minimal ground contact time and with the same leg for the desired number of repetitions. This is repeated for the other leg after a rest period. Single leg plyometric exercises are typically more advanced and require greater strength and balance. They are suitable for sports were a takeoff is completed on one leg.
 Single Leg Lateral Hops
1. Start by standing on one leg with your hands on your waist or at your sides.
2. Proceed to hop to the side while maintaining your balance and hop back to the starting position.
3. You can place a rope on the ground or any object on the ground. The object can be small in size and height or large to increase difficulty.
4. Repeat continuously. Depth Jumps
1. Stand on box with toes close to edge, feet shoulder width apart.
2. Step off (do not jump off) box and land on both feet. Immediately jump up as high as possible and reach up with both hands towards. The jump should be vertical with no horizontal movement.
4. Ground contact time should be short unlike in the diagram. Landing should be soft.Note: Start with a box height of 30cm (12in). Intensity can be increased by gradually increasing the box height to a maximum of 107cm (42in) but this is only for experienced athletes with a substantial strength training background.
Upper Body Plyometric Drills
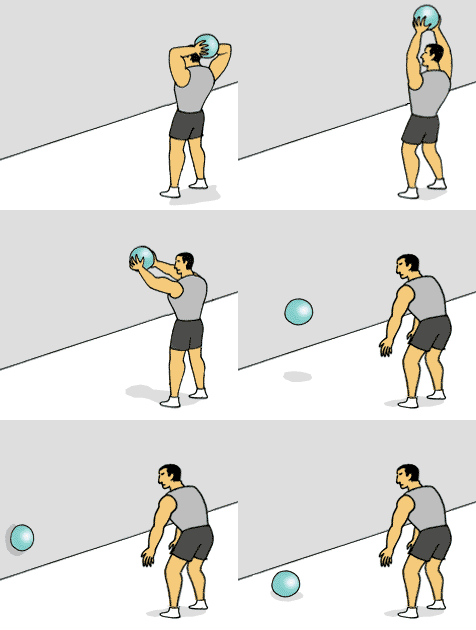 Overhead Throws
1. Stand with one foot in front (staggered stance) with knees slightly bent.
2. Pull medicine ball back behind head and forcefully throw ball forward as far as possible into the wall.
3. Catch ball on the bounce from the wall and repeat according to prescribed repetitions. Keep the time between pulling the ball back and starting the throw (transition phase) to a minimum. Can also be completed with a partner instead of a wall. Side Throws
1. Stand with feet hip-width apart; place left foot approximately one foot in front of right foot.
2. Hold medicine ball with both hands and arms only slightly bent.
3. Swing ball over to the right hip and forcefully underhand toss ball forward to a partner or wall. Keep the stomach drawn in to maximize proper usage of muscle.
4. Catch ball on the bounce from
your partner or wall and repeat. Over Back Toss
1. Stand with feet slightly wider than hip-width apart. Have a partner or trainer stand approximately 10-15 yards behind you.
2. Grasp ball and lower body into a semi-squat position. Explode up extending the entire body and throwing medicine ball up and over the body.
3. The goal is to throw the ball behind you as far as you and generating most of the power in the legs.
4. Catch ball on the bounce from your partner and repeat according to prescribed repetitions.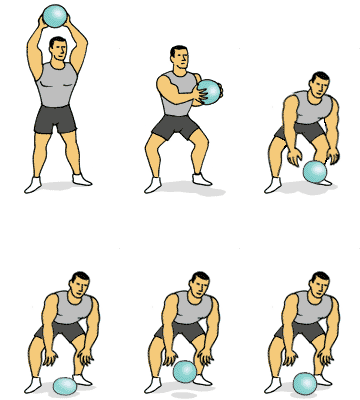 Slams
Slams
1. Stand with feet parallel, shoulder-width apart and knees slightly bent.
2. Pull medicine ball back behind head and forcefully throw ball down on the ground as hard as possible.
3. Catch the ball on the bounce from the ground and repeat according to prescribed repetitions. Explosive Start Throws
1. Stand with feet slightly wider than hip-width apart. Knees should be slightly bent.
2. Pick medicine ball up to chest level.
3. Quickly explode up and press the ball straight out as far and fast as you can.
4. As you press the ball forward explode with either leg so that you actually sprint forward a couple of steps. Single Arm Overhead Throws
1. Stand with feet slightly wider than hip-width apart.
2. Grasp medicine and lower body into a semi-squat position. Explode up extending the entire body and throwing the medicine ball up into the air.
3. The aim is to throw the ball as high as you can and generating most of the power in the legs.
4. Catch ball on the bounce and repeat. Squat Throws
1. Stand with feet slightly wider than hip-width apart. Knees should be slightly bent.
2. Hold medicine ball at chest level and squat down to a parallel position.
3. Quickly explode up and jump as high as you can. As you start your jump you should start to shoulder press the ball up and reach full extensions with the arms when you are at the peak of your jump. Push ball as high as possible into the air. Try to minimize the time spent in the squatted position. It should be a quick squat and jump.
4. Catch ball on the bounce and repeat according to prescribed repetitions.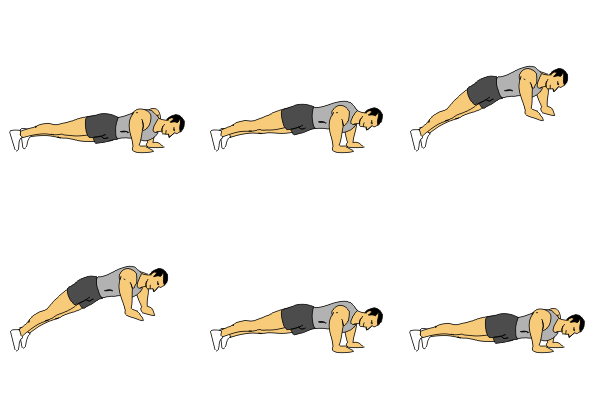 Plyometric Push-Ups
1. Start by getting into a push-up position.
2. Lower yourself to the ground and then explosively push up so that your hands leave the ground.
3. Catch your fall with your hands and immediately lower yourself into a push-up again and repeat.
The Physiology of Plyometrics
Plyometrics refers to exercise that enables a muscle to reach maximum force in the shortest possible time (3). The muscle is loaded with an eccentric (lengthening) action, followed immediately by a concentric (shortening) action.
How Plyometric Exercises Work
A muscle that is stretched before a concentric contraction, will contract more forcefully and more rapidly (4,5). A classic example is a dip" just prior to a vertical jump. By lowering the center of gravity quickly, the muscles involved in the jump are momentarily stretched producing a more powerful movement. But why does this occur? Two models have been proposed to explain this phenomenon. The first is the
Mechanical Model
In this model, elastic energy is created in the muscles and tendons and stored as a result of a rapid stretch (6,7,8). This stored energy is then released when the stretch is followed immediately by a concentric muscle action. According to Hill (9) the effect is like that of stretching a spring, which wants to return to its natural length. The spring is this case a component of the muscles and tendons called the series elastic component. The second model is the
Neurophysical Model
When a quick stretch is detected in the muscles, an involuntary, protective response occurs to prevent overstretching and injury. This response is known as the stretch reflex. The stretch reflex increases the activity in the muscles undergoing the stretch or eccentric muscle action, allowing it to act much more forcefully. The result is a powerful braking effect and the potential for a powerful concentric muscle action (10,11,12).
If the concentric muscle action does not occur immediately after the pre-stretch, the potential energy produced by the stretch reflex response is lost. (i.e. if there is a delay between dipping down and then jumping up, the effect of the counter-dip is lost).
It is thought that both the mechanical model (series elastic component) and the neurophysical model (stretch reflex) increase the rate of force production during plyometrics exercises (6,7,8,10,11,12).
The Stretch-Shortening Cycle
All plyometric movements involve three phases. The first phase is the pre-stretch or eccentric muscle action. Here, elastic energy is generated and stored.
The second phase is the time between the end of the pre-stretch and the start of the concentric muscle action. This brief transition period from stretching to contracting is known as the amortization phase. The shorter this phase is, the more powerful the subsequent muscle contraction will be.
The third and final phase is the actual muscle contraction. In practice, this is the movement the athlete desires the powerful jump or throw.
This sequence of three phases is called the stretch-shortening cycle. In fact, plyometrics could also be called stretch-shortening cycle exercises (1).
How to Increase Your Vertical Jump
One very quick and simple way to demonstrate the effect of the stretch-shortening cycle is to perform two vertical jumps. During the first vertical jump the athlete bends the knees and hips (eccentric muscle action or pre-stretch) and holds the semi-squat position for 3-5 seconds before jumping up vertically (concentric contraction) as high as possible. The 3-5 second delay increases the amortization phase.
On the second jump the athlete bends the knees and hips to the same degree but immediately jumps up without a delay. This keeps the amortization phase to a minimum and makes best use of the stored elastic energy. The second jump will be higher.
Is Plyometric Training Really That Effective?
By making use of the stretch-shortening cycle, movements can be made more powerful and explosive. Plyometrics is simply a set of drills designed to stimulate the series elastic component over and over again preferably during movements that mimic those is the athletes sport. But what long-term effect does practising plyometrics have on the body and performance?
A wide variety of training studies shows that plyometrics can improve performance in vertical jumping, long jumping, sprinting and sprint cycling. It appears also that a relatively small amount of plyometric training is required to improve performance in these tasks. Just one or two types of plyometric exercise completed 1-3 times a week for 6-12 weeks can significantly improve motor performance (13,14,15,16,17,18,19). Additionally, only a small amount of volume is required to bring about these positive changes i.e. 2-4 sets of 10 repetitions per session (14,16) or 4 sets of 8 repetitions (15).
While upper body plyometrics has received less attention, three sessions of plyometric push ups a week has been shown to increase upper body power as measured bymedicine ball throws (20).
Using a variety of plyometric exercises such as depth jumps, counter-movement jumps, leg bounding and hopping etc., can improve motor performance (13,22,23,24,25,26,27,28). While the majority of studies have focused on untrained subjects, trained athletes such as soccer and basketball players have improved their performance with plyometrics (16,23,28).
Plyometrics & Concurrent Strength Training
A conditioning program consisting of both plyometric training and resistance trainingcan improve power performance in the vertical jump (13,14,29,30,31,32) and 40yard sprint time (33).
It appears that concurrent resistance and plyometrics training can actually improve power to a greater extent than either one alone (13,29,30,33). However, the overall program should be carefully planned as heavy weight training and plyometric training are not recommended on the same day (3). One way around this is to alternate upper body and lower body exercises as follows:

Plyometrics & Injury
Strength and conditioning specialists are often cautious in their prescription of plyometrics due to what they believe is an inherent risk of injury. However, there is limited data to either confirm or reject this claim.
Several researchers have explicitly stated that no injuries occurred during their plyometric studies (13,33,34). Most do not mention whether injuries occurred or not or to what extent.
As a precaution it has been suggested that athletes have a substantial strength training background. The criteria often cited is that the athlete should be able to back squat 1.5-2x bodyweight (2,3,35) for lower body plyometrics and bench press 1x bodyweight for upper body plyometrics (3,35).
If injuries are more likely to occur with this form of training it may be due to improper landing, landing surface or depth jumps from too great a height (1). Several studies have measured the height of depth jumps on vertical jump performance. Depth jumps from both 50cm (19.7) and 80cm (31.5in) both improved power to the same extent (13). The same results were found between jumps of 75cm and 110cm (31) and between jumps of 50cm and 100cm (16). This suggests that there may be little or no added benefits of jumping from heights above 50cm (19.7in) even though the risk of injury is likely to rise.
Finally, landing surface is an important component of the plyometrics session. It should posses adequate shock absorbing properties such as grass, rubber mats and a suspended floor. Concrete, tiles, hardwood and crash mats are not suitable (35).
Plyometric Exercise Selection
There are many plyometric exercises for both the upper and lower body. As with other forms of sports training, exercise selection should mimic the movement patterns of the sport as closely as possible.
Lower Body Plyometric Exercises
lower body plyometric exercises are suitable for many sports such as basketball, track & filed athletics, sprinting, soccer, hockey, rugby, football, baseball and so on. In fact, performance in any sport that involves jumping, sprinting or kicking can be improved with lower body plyometric exercises.
Upper Body Plyometric Drills
Performance in sports such as basketball, volleyball, softball, baseball, tennis, badminton, golf and the throwing events in athletics can benefit with upper body plyometric exercises. Also, certain position players such as goal keepers in soccer will find these drills useful. Most upper body plyometric drills requires the use of a medicine ball.
Exercise Intensity
The intensity of plyometric exercises varies greatly. Skipping exercises are classed as low intensity, while reactive drop jumps from 32in (80cm) and above are the highest intensity of the plyometric exercises. See the table below for further intensity classifications:

Plyometric training should progress gradually from lower intensity to higher intensity drills, especially for individuals who lack a significant strength training background.
Increasing the load by adding additional weight thought weighted vests of ankle weights for example, is not recommended. Too great a load can reduce the speed and quality of movement negating the effects of plyometrics.
Volume
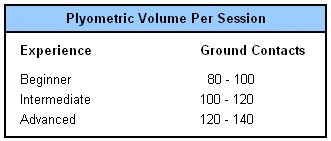
Plyometric volume relates to the number of repetitions per session. For lower body exercises a repetition is a ground contact. See the table below for the number of repetitions recommended for a plyometric training session:
Frequency
It is not recommended that plyometric training be scheduled for the day after a heavy weight training session when muscles may still be sore. This poses a planning problem for athletes that may need to strength train 3-4 times per week. The table below offers a solution to this problem by alternating upper and lower body strength training with upper and lower body plyometrics:Typically, 2-3 sessions of plyometrics can be completed in a week. Alternatively, recovery time between sessions can be used to prescribe frequency and is recommended at 48-72 hours .

The phase of the training program will also determine how many plyometric training sessions are suitable per week. For example, a track and filed athlete may require 3-4 sessions during the preparation phase reducing to 2-3 session in-season. A football player on the other hand may require only 2-3 sessions pre-season reducing to 1-2 sessions during the competitive season.
Rest Intervals
The effectiveness of a plyometric training session depends on maximal effort and a high speed of movement for each repetition. Rest intervals between repetitions and sets should be long enough to allow almost complete recovery (4). As much as 5-10 seconds may be required between depth jumps and a work to rest ratio of 1:10 is recommended. For example, if a set of bounds takes 30 seconds to complete, the rest interval between sets would be 300 seconds or 5 minutes.
Warming Up
As with any training an adequate warm up is required before completing a plyometric training session. The Nation Strength & Conditioning Association (3) recommends that toe jogging and straight leg jogging be included as part of the warm up to prepare for the shock impact of plyometric drills. Plyometrics should be completed at the start of a combined session when the athlete is fresh.
Safety Considerations
Limited data exists as to whether there is any increased risk of injury through plyometric training. However, due to the stress that repeated shock-tension exercises can place on joints and connective tissue, several safety guidelines have been proposed (4).
It has been suggested that athletes should be able to complete a one repetition maximum squat a weight 1.5 times that of their bodyweight and bench press a weight 1-1.5 times bodyweight (4,5,6,7,8).
Balance is also an important factor in the safe performance of plyometric exercises. Again, it has been recommended that athletes can stand on one leg for 30 seconds in order to complete less intense exercises. For more advanced exercises they should be able to stand on one leg for 30 seconds in a semi-squat position (4).
Plyometric training is contraindicated in prepubescent children as it may cause damage to the epithyseal plates that have yet to close (7,9). Some strength and conditioning professionals have questioned this as children routinely perform jumping movements as part of unstructured play. However, to be effective, plyometric training requires numerous, repeated maximal efforts. It is the structured nature of training that may pose an over-training risk to younger individuals.
Finally, the landing surface must posses adequate shock absorbing qualities. Good choices include grass, a suspended floor and an exercise mats (not crash mats).
Sample Plyometric Training Sessions
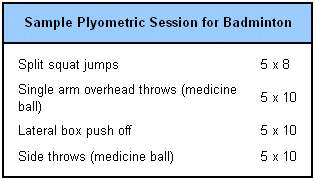
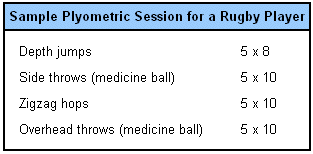
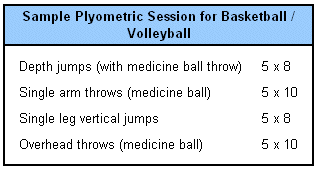
Below are sample plyometric training sessions for badminton, basketball/volleyball and rugby. You will find more examples in the sport-specific sections of the site.
